Breaking Butch on Drainage Problems
I was doing laundry this week, and found that the washer didn’t seem to be spinning the clothes after the wash cycle, and left water in the tank. So I fixed the washing machine. I also had a problem with drainage on the back deck, and I fixed that over several evenings last week, and have the photos detailing that extensive DIY project.
My GE washing machine is only about 22 months old, but is of course no longer under warranty. I’d called their repair center to get someone out to look at it. Someone was scheduled for Monday afternoon, and it was a $79 trip charge. Interestingly, any parts and repairs the repairman makes are guaranteed for five years, instead of the one year new machine warranty. I asked the call center guy why they didn’t use the “five year parts” in the original construction. I don’t think he got the joke.
I had looked at the owner’s manual, which of course was in three languages, and talked about four different models of washer. In the troubleshooting section one recurring solution was to clean the drain trap. And indeed, there was a drawing of a round plug to be removed to do just that, but the sketch was so close up, it gave not a hint where on the machine it was, and I looked all around the machine unable to find it. I just figured it might be a feature on one of the other models.
Finally, I got desperate, and started taking off panels. I took off the top, but that didn’t really offer access to anything I could work on, so I got on the floor and took out the three screws holding the bottom front panel on, and there was the drain trap. I found Lay’s missing good luck charm, a five dollar bill, and about four dollars in change…along with lint, strings, and assorted other muck. The washer is running fine now, and GE has been called to cancel the service call.
I do have to hand it GE, I liked how the service call system worked. I got a representative fairly quickly when I called in to request service. When I called to cancel, the system recognized my phone number, looked up the service call based on that, and I was able to cancel the service call with a menu selection.
Now to the big project from last week. I have a concrete deck running from the back of the house and about eight feet out. It is appropriately sloped away from the house. Then there’s a three and one-half inch gap before the pool deck which ranges from about one and one-half to two and one-half inches higher than the other deck. When I bought the house, the trench had a few sharp white rocks in it, and over time the ground has percolated up and filled in the gap. This meant that when we had the smallest about of rain, the deck had a couple of inches of standing water at the lowest corner, and water over most of the deck. When trying to pressure wash the deck, muddy water from the gap just washed back over the deck. I knew I had to do something.
So, I started digging. This was tough going because of how narrow the gap was, and the fact that a line for sprinkler system ran through this area also. Combined with the rocks that were worked into the dirt, and you had a pretty rough twenty-six foot trenching project.
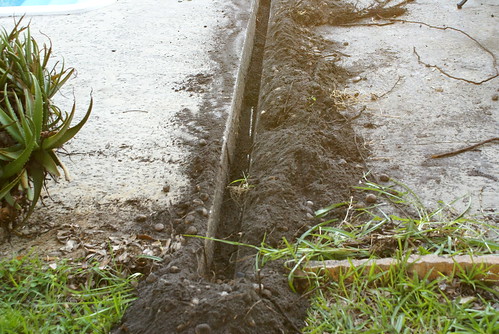
I wanted to be sure this was all done right, so then I also dug a three by three by three foot drain field at the end of the trench. The plan was to have river rocks in the trench which would allow it to handle a good deal of water, but also a pipe to carry water away for the real downpours or hurricane drenching we get.

I filled the drain field with about two feet of gravel, then put a piece of landscape cloth on top so the dirt won’t infiltrate down into the gravel drain field.
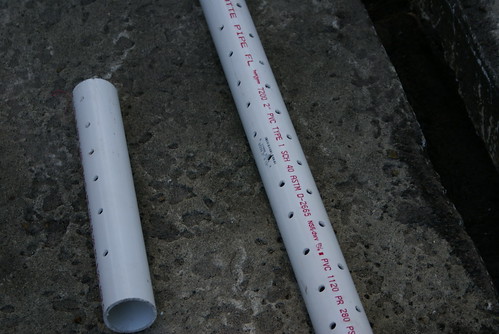
It wasn’t as simple as using the black flexible drain pipes with the slits in them, as those are four inches around, and my gap is only three and one-half, so I had to do three inch PVC and drill holes all down it. I put them about 60 degrees apart on the top.
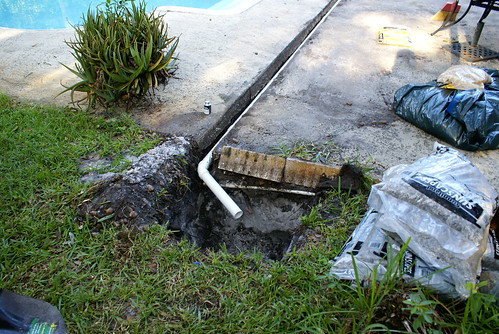
The short piece is designed to be on a sixty degree elbow joint, and run out at a slight down angle into the drain pit (holes down). You can also see more of the sprinkler system pipe along the edge of my drain pit, also making some of the digging a bit tedious. You have to realize the sprinkler system was already here, and I really have no idea how the piping is laid out.
It took about a dozen bags of drainage gravel, and four bags of river rock for the trench. As I noted earlier, I wanted to try to build this system so I won’t have to worry about it for some time, so I also put a “sediment shield” over the entire piping system. this is basically a loose weave nylon sock.

After installing the pipe and drain field rock, I covered the landscape cloth with dirt to level it back up, and put two pieces of sod on top. I’d tried to take up the existing sod, but it was so full of rocks that it just broke apart. I think there used to be a planting area there.
All in all, it wound up costing about $100 for the supplies, and took about three evenings of digging and one early morning to bore the holes. I got it finished Friday evening, and Saturday morning we had a strong band of rain from Gustav as it went by, and it drained perfectly. I’ve also pressure washed, and there was not a drop of standing water.